Thursday, 5 December 2019

Secure Remote Desktop Connection

                       Remote Desktop Service is one of the best features, to Administrate the server via remotely for IT administrators and developers to perform their day to day activity. However, while login the server remotely, we are using our High privileged accounts. When there is attack on server, there is possibility to lose our credentials.

                    Microsoft offer a new solution RestrictedAdmin mode, it has been introduced on Windows server 2012 R2 onwards, and it was designed to help protect administrator accounts by ensuring that reusable credentials are not stored in memory on the remote server or computer. This includes scenarios when server administrators use admin credentials for remote PC support or when domain admin accounts are used to connect remotely to member servers. Their credentials will not be available, for any malicious or malware to attack. 

How Typical RDP process works:

            By default, Remote Desktop is using Remote Interactive logon process to authenticate: while RDP to the server, the user’s credentials are sent (over a secure channel) to the remote device and if the login successful then the user can access the remote desktop.

Once User RDP the server, the server will register successful logon event with Logon type: 10 (Type 10 means Remote Interactive logon).

If you check the server cached credentials, you could see the NTLM hash on the memory. Even if we leave the server and our session become stale, the hash won’t leave the server. Rebooting the target device after use is the only way to ensure that credentials from stale or leaked logon sessions are removed completely from memory.
How RestrictedAdmin RDP connection works:
Microsoft introduced new feature restrictedadmin from window server 2012 R2 onwards. Using restrictedadmin mode, RDP is using a network logon process, instead of remote interactive. Using network logon ensures that the user’s credentials are never sent to the target device, therefore they are not available for theft.

To use restrictedadmin mode the remote target, need to support it and the below switch will take to the restrictedadmin console. 
mstsc /v:<server name> /restirctedAdmin
A view from the security event log after using restirctedAdmin switch:

And now if we capture the Server credentials dump, system reveals that the user token is there, but it’s populated with the target device computer account details!
When we are trying to access other network resources while connected to the remote session we can see “access denied” errors, and that’s because we are authenticating (and try to access resources) using the computer account, not the user account.
Restricted admin is disabled by default, and you need to explicitly add the switch /restrictedAdmin to mstsc command line and enable it on the target device.
 Remote Credential Guard
Remote Credential Guard enables you to protect your privileged credentials and access network resources from within the remote session.
To use the remote Credential Guard mode the remote target, and you need to use the following command line:
mstsc /v:<server name> /remoteguard


Windows Defender Remote Credential Guard blocks NTLM (allowing only Kerberos), prevents Pass-the-Hash (PtH) attacks, and prevents use of credentials after disconnection.

Comparison between Remote Desktop security modes:


Pre Requires for Client Computers:

When we are trying to open RDP on client computer to perform remote administration, by default RDP connection will initialize. So, if we want to force Client RDP request to use /RestrictedAdmin mode, enable the below GPO to enforce the settings.
GPO setting is located under the Administrative Templates under Computer Configuration > System > Credential Delegation > Restrict delegation of credentials to remote servers. Enable the Policy.

How to Enable RDP on Target Server:

Once client initializes the secure RDP session, our target device should accept the request, in which the below registry key must be pushed to the servers. Either manually or GPO.
Browse to HKEY_LOCAL_MACHINE\System\CurrentControlSet\Control\Lsa
Add Registry Key DisableRestrictedAdmin Type: REG_DWORD Value: 0


Limitation of Secure RDP session:
Rstrictedadmin mode you can’t connect to other network resources as its not passing the credentials.
Ref: The below Article help us to compare all RDP sessions feature and implementations. Please have them check to understand more about the Secure RDP.

**********************Happy Learning********************


Monday, 2 December 2019

Secure Your Privilege Account by using Authentication Policy and Silo


Secure Your Privilege Account by using Authentication Policy and Silo


As discussed, previous post the protected user group is one of the great features in 2012 R2, to improve privilege account security and provide better protection against legacy protocol and enforce privilege accounts to use newer Kerberos protocol and play well against credentials caching. Protected Users group has a pre-defined scope, what if I wanted to change the configuration.  
for example, the default TGT lifetime about 4 hours, what if we wanted to customize them based on my company policy. Adding Service Accounts & Computer Accounts in protected user group is not advisable and it may lead the authentication failure, what if I wanted to improve security for service and computer account.
Authentication Policy and Authentication Silo is another way to secure an Active Directory based environment. This provides a more robust method, beyond configuring logon restrictions, and
restricting which accounts can access specific servers in your environment. Protected Users group has a Pre-defined scope, where as authentication policy and silo do not.

Authentication Policy and Silos:

Authentication Polices and authentication policies Silo leverage the existing Windows authentication infrastructure and the use of the NTLM protocol is rejected, and the Kerberos protocol with newer encryption types is used.
In contrast to the limited Log on to: previous versions of Windows. By using Authentication Policies and Authentication Policy Silos you can create a group of computers to which a (group of) user(s) can log on to.
Authentication policies allow you to configure settings, such as TGT lifetime and access control conditions, which specify conditions that must be met before a user can sign in to a computer. For example, you might configure an authentication policy that specifies a TGT lifetime of 120 minutes and limit a user account so that users can only use it with specific devices.
Authentication policies are enforced during the Kerberos protocol authentication service (AS) or ticket-granting service (TGS) exchange.
The cool thing about Authentication Policies and Authentication Policy Silos, is that unless computer or user account objects meet the criteria in the rules, a Ticket Granting Ticket (TGT) will not be issued. At all.
The combination of Authentication policies and the Protected Users security group by providing a way to apply configurable restrictions to user, services and computers accounts.
You configure Authentication Policies and Authentication Policy Silos using
Active Directory Administrative Center or powershell.


How the Kerberos protocol is used with authentication policy silos and policies

I referred the below article to understand this new feature, please read them, it would help us to understand how the policy will enforce while login user account into device.

When a domain account is linked to an authentication policy silo, and the user signs in, the Security Accounts Manager adds the claim type of Authentication Policy Silo that includes the silo as the value. This claim on the account provides the access to the targeted silo.
When an authentication policy is enforced and the authentication service request for a domain account is received on the domain controller, the domain controller returns a non-renewable TGT with the configured lifetime.
When an authentication policy is enforced and the authentication service is armored, the authentication service request for a domain account is received on the domain controller, the domain controller checks if authentication is allowed for the device. If it fails, the domain controller returns an error message and logs an event.
You can use a single authentication policy for all members of a silo, or you can use separate policies for users, computers, and managed service accounts.
Prerequisites:

Ø  All domain controllers in the domain must be based on Windows Server 2012 R2 and above.
Ø  The domain functional level must be Windows Server 2012 R2 and above.
Ø  Domain controllers must be configured to support Dynamic Access Control.
Ø  Windows 8, Windows 8.1, Windows Server 2012, and Windows Server 2012 R2 domain members must be configured to support DAC, including Kerberos compound claims (device claims)
Let’s Setup Policy for Domain Admins and Enforce them to use only domain controllers.

Prerequires to setup Authentication Policy and Authentication Silo.


Step 1: Before Authentication policy creation, our domain controller should support claims and compound authentication for Dynamic Access Control and Kerberos armoring, do this by enabling the following group policy setting on “Default Domain Controller” policy.

Expand out the following location, Computer Configuration\Policies\Administrative Templates\System\KDC and Enable the below policy.

Step 2: Configure the client computers to request claims, provide information required to create compounded authentication and armor Kerberos messages.

This setting will need to be enabled on the client systems in the domain, hence I enabled this policy on “Default Domain Policy” on following location, Computer Configuration\Policies\Administrative Templates\System\Kerberos

So, all the prerequisites are set, now we will setup Authentication Policy and Authentication policy Silo.

Setup Authentication Policy and Silo

Step 1:
Open Active Directory Administration Center and you could see there is two new containers Authentication Polices and Authentication policy Silo.
Note: You can create Authentication Policy without Silo; however, you cannot create Authentication policy Silo without Authentication Policy.


Authentication Policy: An Authentication Policy defines TGT Lifetime, and Authentication Access Control Conditions.

Authentication Policy Silo: An authentication policy silo controls which accounts can be restricted by the silo and defines the authentication policies to apply to the members.

Step 2:  Create Authentication Polices

     Use appropriate name while configuring Policy Name which you want to set and update description fields and define the rules. 

I have restricted my Domain Admins TGT value 120 minutes.


Step 3: Create Authentication Policy Silos


Use appropriate Name while configuring Policy Name with respective of their role and fill the description.
Apply the Authentication Policy, which we created in a previous step 2.


OK now time to add our domain admins accounts and domain controller we wish to allow them for access.


We added our domain admins and domain controllers, however the policy not yet assigned to those objects. See the above screenshot Assigned and we don’t see any policy pushed yet.

Step 4: Lets push the policy:

Select each object and double click and assign Authentication Policy Silos which we create now.


And repeat the same step for Computer Account also.

Good to see now our policy has been assigned to both objects.
Step 5: Enable Access Control conditions

                              Ok now all set, there is final step to complete the configuration. Create Access Control condition, where we created our authentication policy Restrict DomainAdmins under the User Sign on section, specify access control conditions that restrict devices that can request a Ticket Granting Ticket for the user accounts assigned to this policy.

Specify Access Control condition below.


Validate the Configuration.

1)     Login domain controller by using PA-User1 and check TGT Lifetime.

By using PA-User1, I can login Domain Controller DC1 and my TGT life time is default 10 hours.

2)     Login domain controller by using PA-User2 and check TGT Lifetime.

In contrast, when I login the DC1, by using PA-User2, my TGT lifetime is shorter and it only 2 hours. 

3)     Login PA-User2 one of the member server.
When a user assigned an authentication policy attempts to log on to a machine to which he/she is
not allowed access, the attempt fails with the following error will occur.

The DC will register corresponding event log below.


*************Happy Learning******************* 


Wednesday, 20 November 2019

Access-based Enumeration

                 By default, all folders and files will be listed when access specific share path, even if the browsing user doesn’t have permissions on those shares.
                   Access-based enumeration is Windows Server feature which causes the server to display only the files and folders that a user has permissions to access. Once ABE is enabled on the share, users will only see those folders for which they have access.
                   This feature is active only when viewing files and folders in a shared folder; it is not active when viewing files and folders in the local file system.
                  Just FYI
                 ABE is not a security feature (it’s more of a convenience feature)

Now let’s jump into the Lab and see how it works.

First Create Share on File-server and define the permissions, based on the requirement.


Define permissions on target folders, I created two folders for User1 and User2 and i restricted their NTFS permissions specific to users. 

Now create share via “file and Storage Service” 

Specify folder location, where your users’ folders are located.

Configure the Share Name

Enable Access-Based Enumeration to use ABE feature.

Create Share and publish it for the users.
We almost done, let see how it work from user desktop.

Login User1 computer and access share \\10.10.10.1\user_share 

Wow!, now lets check , what happen if user 2 logged in.


OK now all look good, and we found user views are confined based on their permissions.

              So far, we are working with individual file server. Now we will try to use this feature into DFS. Let see how it work if we integrate them into DFS.

 Let me create DFS Namespace and configure target.

I have created Name Space called “Common_Share” and Enabled ABE on the “Name Space”

Let me link the User Share on DFS.

OK all settled now login User1 Computer, and Access Share by using DFS Name.


OK, nice to see the result. Let’s check the user 2 as well. 


***************Happy Learning*************


Monday, 18 March 2019

Automate DSRM Password Update

DSRM Password:


Managing DSRM Password is one of Key aspects in every AD Administrators, whether it’s to perform an authoritative restore or fix database issues, will need the local administrator password.
Typically, we don’t use DSRM password when dc running normal state, and the DSRM credentials are not like our regular credentials to use them daily usage, hence forgetting the password is quiet expected behavior.
The DSRM Password has been set during domain controller promotion, hence maintaining the password consistency is one of the other challenges.


Solution:
Microsoft had introduced one of the new features starting form windows server 2008, the DSRM Password can be synchronize your Active Directory Domain Account.


Key Feature:
Ø  DSRM Password can be change regular basis.
Ø  The process is including exiting Domain Controller and New Upcoming Domain Controllers.

Let’s jump into the LAB and see how it works:


> Create Standard Domain Account with following values.
> Account Disabled State for security reason.
> Password Never Expires Should be enable.
> The account does not need to be part of any privilege group.

> To Synchronize DSRMSync Account password into domain controller, run the following command.
 Ntdsutil "set dsrm password" "sync from domain account DSRMsync" q q

> The Account successfully Synced to DSRM, to validate the password I am going to reboot the DC with DSRM mode.


> Login the domain controller with password of DSRMSync Credentials. 
We successfully passed DSRM Console with AD Account.
   > DSRM process does not recognize AD Account password changes, hence we need to synchronize the password every password update.
      > Updating the password 100 plus domain controllers always not possible through manual, Hence, we perform this activity through GPO. Consider we are resetting our DSRMSync password every quarter during SOX etc. we will schedule to update our AD Password every 3 months once.
  >To Enable this feature, we would require one Service Account with “Domain Admin” Privileges. 
     
     > Open GPMC and create NEW GPO / Use Existing GPO on Domain Controller OU to enable this feature.


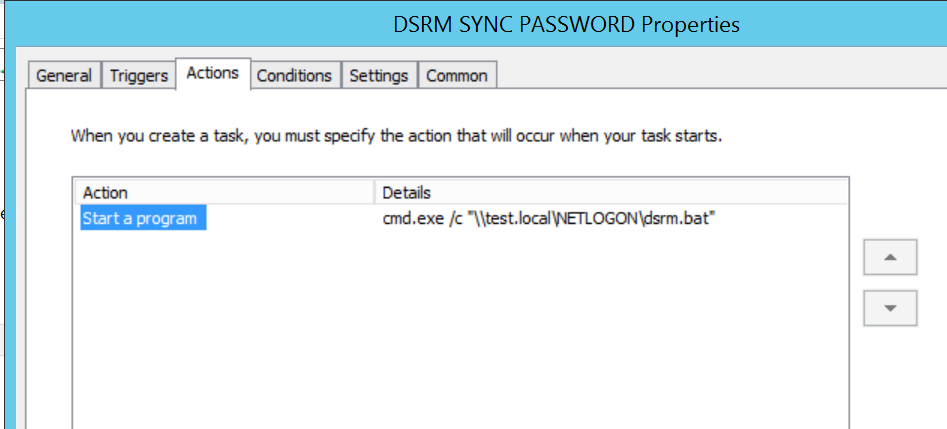
     > Create Schedule task under Computer Configuration


> Action Tab

> Wait for the GPO update, verify the DC task scheduler.

> Reset the Password of DSRMSync and Run Schedule task to manually check the sync process.

Password changed suceessfull.

A user account was changed.

Subject:
              Security ID:                         TEST\Administrator
              Account Name:                   Administrator
              Account Domain:                TEST
              Logon ID:                           0x457E8

Target Account:
              Security ID:                         TEST\DSRMsync
              Account Name:                   DSRMsync
              Account Domain:                TEST

Run Sync manually


> WOW it got synced!

                                      *****Happy Learning*****